
ALREADY PURCHASED
Cancer
Rated 5.0 out of 5
To view pricing in your currency, select your shipping country below.
Date
January 30, 2021Time reading
5 minutes
At Diamond Art Club, diamond painting is our passion. We know even a short painting session offers the perfect opportunity to get crafty, relax and, most importantly, have fun while unleashing our inner artist. From prepping a new canvas to putting the finishing touches on our latest masterpiece (and every step in between), we love it all.
As your go-to resource for all things diamond painting, our team is always looking for new and fun ways to help our customers up their artistic game. We continuously research hundreds of posts to consolidate the best diamond painting tips, tricks and hacks, making sure they’re up to date and useful. Ready for some original hacks to up your diamond art game? Here are a few of our favorites:
If you’re unfamiliar with the process of “kitting up” or “kitting down” your next diamond painting project, this tip will change the way that you work. Basically, the process of kitting up involves getting your project organized and prepared prior to beginning the project. When you receive your diamond painting kit, you’ll find a number of individually bagged diamond drills along with the legend key that will show you which numbers/codes correspond with particular drills. These codes will also be displayed on your canvas so you’ll know exactly where each bead is intended to be placed.
“Kitting up” means that you’re going to take the individual stickers from the legend and place them on to your separate bead organizers. If peeling each sticker off seems too tedious for a short project, you can also use a marker to write on your bead boxes, but be aware that you won’t be able to remove this writing during the “kitting down” process.
As you stick the labels to your organizer boxes, you’ll want to pour the corresponding drill color into the properly labeled box. Once you’ve done this with every color, you’re ready to begin your project. This tip helps to keep everything organized and allows you to find your drills more easily. Once you’ve finished the project, you can “kit down” by pouring the remaining drills into small plastic bags, writing the corresponding code on the bag and storing for future use.
Shop All Diamond Art Kits for Sale

Washi tape has become a very popular tool for crafting. Many people integrate washi tape into their scrapbooking or journaling projects, but it can be used for a variety of crafts. You can even use it on your walls as accent decorations. When using washi tape for diamond painting, however, it can be used in a decorative or practical manner. Many people use washi tape to section off their canvas into smaller square areas. You can use this grid to hone in on a particular section while covering the rest of the squares with a protective material to prevent dust or dirt from sticking to the canvas or eliminate the chance of accidentally disturbing a section that has already been completed.
Another common use for washi tape is to create a decorative border. This fun, versatile crafting accessory is available in dozens of different designs. Find a pattern or color that matches with your completed painting and use the washi tape to create a beautiful border around your new masterpiece.
What’s Washi Tape? How to Use Washi Tape in Diamond Painting
Okay so this isn’t a novel idea, but it’s great for those that like to upcycle! Don't recycle the egg carton after you've made your last omelet – repurpose it. An average egg carton serves as an outstanding diamond organizer that you can easily close when not in use. You can also use our diamond organizer with 30 slots to keep all your colored gems separated.
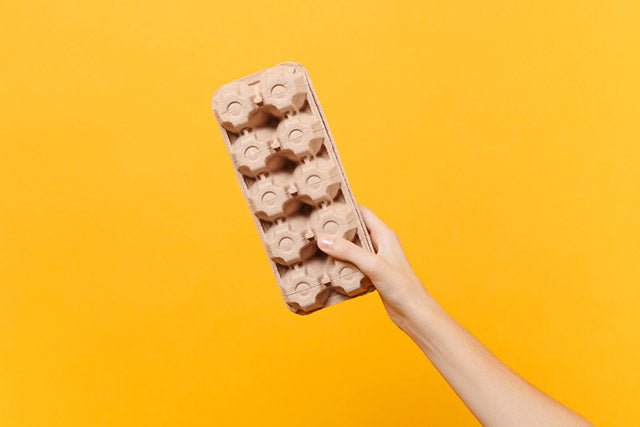
If using an egg carton isn’t your thing, check out some of our other diamond painting storage tips in this post.
No empty egg cartons or storage containers? No problem. Sort your diamonds into the plastic Ziploc bags included in your kit. Use a marker to label each bag or slot with the corresponding number or symbol.
Multi-placer tools are a great diamond painting accessory as they can help you quickly place down sections of drills that are the same color. However, getting them prepared on the drill tray can be time-consuming. Pour your drills onto one tray and then use another tray to press down gently and separate clumps of drills. Once you’ve separated them, try to place them neatly on the tray so that you can more easily and quickly pick up multiple diamonds at once.
Learn More Diamond Painting Multi-Placer Tips

Speaking of multi-placement, if you haven’t done it already, try using one of our diamond multi-placer pens. Diamond painting allows you to set the pace, so if you want to work faster, you need a tool that will help. Many of our kits come with a double-sided tool that lets you pick up one diamond at a time or a bunch! Check out our accessories to browse all our different multi-placer styles as well.
A little bit of prep work goes a long way when starting your project. Take a few minutes to glue or tape your diamonds next to their canvas symbol. Voila! You have a 3D code! This way, you can quickly reference the specific diamonds you need in a single glance.
Thought you were done using kitchen supplies after our egg carton tip? Guess again. One of our oldest tips is taping your canvas to a clean cutting board so you instantly have a mobile workspace. Need a little extra light? Grab our diamond painting light pad so you can see what you’re working on and move your workspace as you go.
Looking to have a more permanent crafting space? Read our tips on how to create the perfect diamond painting workspace.

Sometimes our diamonds seem to stick to everything BUT our canvas. No problem! Diamond Art Club fans have a workaround that works wonders. Some place cut up dryer sheets in with the stored gems to eliminate static cling. Game changer!
Have you ever been in the middle of a diamond painting project and realized that you ran out of wax? It can be very frustrating, especially if you’re nearly done with your project. Luckily, there are plenty of household items that can actually be used in place of the traditional wax, with reusable putty being one of the most common. Try to find options that can easily pick up the drills, such as Playdough or tweezers. If you have some of these lying around the house, it makes for a wonderful replacement for regular diamond painting wax. But, we recommend always keeping some on hand in case your wax runs out unexpectedly.
3 Diamond Painting Wax Alternative You Can Use in a Pinch
One of the most frustrating aspects of completing a diamond painting can be working around the protective cover that comes with the painting. This is an essential part of the project because it’s intended to keep your canvas clean and prevent dirt or dust from landing on the adhesive canvas — but it can make working with the painting more difficult.

Instead, you should try using parchment paper for diamond painting. First, you must completely remove that outer cover that comes with the painting. Don’t worry – you’ll be covering up the exposed canvas with parchment paper shortly. Cut up the paper into smaller, square sections and begin placing them over the canvas, overlapping each piece slightly to ensure that none of the canvas beneath is exposed. Press on each individual piece and rub to help the paper stick to the canvas. This now allows you to work on small sections at a time without having to fight the large protective cover or leave the rest of your canvas exposed to debris. Release paper can also be used to implement this vital tip.
Wrinkles are an inevitable part of diamond painting, but there are many different ways that you can get these out of your canvas and create a beautiful finished product. Wrinkles don’t actually impact the final result, but for many painters, they are a distraction during the process. It’s not unusual for Diamond Art Club kits to have wrinkles sometimes as a result of our poured glue method, the superior way to prepare a canvas. Some companies use double-sided adhesive canvases instead, which is essentially a canvas with a giant piece of double-sided tape. The poured glue canvas is known for being easier to work with and creating a more realistic, clear picture at the end.
However, the method of pouring the glue over the canvas and allowing it to sit out for 12 hours can cause some wrinkles. If you want to remove these to help you focus on your design, it’s fairly simple and there are several ways to do it. A heating pad is an easy tool that many people already have lying around the house. This method doesn’t require you to use an iron or fabric spray (two other common methods of removing wrinkles). Instead, simply place a towel down on a flat surface and then place the heating pad on the towel and cover with another towel. Basically, you’re sandwiching your heating pad between two towels. Place your canvas design-side up on the top towel layer and then add something flat on top of the canvas (i.e., a cookie sheet). Turn the heating pad on (low or medium heat recommended) and allow the canvas to sit for 10 to 15 minutes before removing it from the heat.

Another common method for getting rid of wrinkles is by using an iron. With this method, you’ll want to be cautious and avoid keeping your canvas under the heat for too long. Although this is the common method, it can potentially disrupt the glue, so you’ll want to exercise extra caution. Never use an iron on your canvas after you’ve already placed diamond drills down. With a new canvas, place it face down on a flat surface and place a towel over it. Turn your iron on low (if it’s too hot, it can interfere with the glue, impacting its adhesive abilities) and carefully iron the canvas with the towel in between.
How to Get Wrinkles Out of a Diamond Painting Canvas
It’s always a good idea to hang on to your extra materials even if you’re not sure what to do with them. Invest in a craft organizer and store extra drills, wax and other accessories. You never know when you might need them. If you’re going to hang on to your additional diamond drills, be sure to save the label sticker with the code number that corresponds to that color and shape. This will help you ensure that you’re using the right drill in the future.
What to Do with Leftover Diamond Painting Beads

Whether you’re planning to frame your diamond painting or not, some people like to seal their canvases after all the drills have been properly placed. This can help maintain the quality and prevent drills from falling off. Although the adhesive part of the canvas has been covered, it is still possible for dirt, dust and debris like pet hair to creep its way into the crevices. Your two main options when it comes to sealants are spray-on or brush-on. Spray-on sealants are advantageous because they do not cause yellowing, but they don’t act as a glue so if there are any existing gaps between drills, you will still be able to see them. Brush-on sealants will be able to fill these gaps, but can cause wrinkles or yellowing over time.
Should I Seal My Diamond Painting?
Implementing some of these diamond painting tips will help you take your projects to the next level and make the process a little bit easier. Keeping your diamond painting accessories organized and close by is always a smart idea to ensure that you have everything you need to create your masterpiece.
Did we miss your favorite painting trick?
Tell us about it in the comments below! Be sure to share these tips with your fellow die-hard Diamond Art Club fans!
Image Sources:
Mariontxa / Shutterstock.com
xMarshall / Shutterstock.com
KAY4YK / Shutterstock.com
Followtheflow / Shutterstock.com
RHIMAGE / Shutterstock.com
Nathan Antonino / Shutterstock.com
ViDI Studio / Shutterstock.com


© Wildbrain / Strawberry Shortcake

© Disney / The Nightmare Before Christmas™


© Viacom / Avatar: The Last Airbender


Diamond Art Club Save 20% by using our app!